Experience the power of Luzmo. Talk to our product experts for a guided demo or get your hands dirty with a free 10-day trial.


August 22, 2019
Brecht De Rooms
What is multi-tenancy? And how to integrate dashboards into a multi-tenant platform? This guide will show you how to set up multi-tenancy in Luzmo.
Multi-tenancy is the ability of software to serve multiple clients. This means that the platform is capable of keeping data of different clients separate. There are multiple ways to implement this and Luzmo aims to provide a good solution for each of them. Since it’s always easier to reason about a concrete situation, let’s describe a simple scenario.
Imagine a burrito restaurant chain. The chain produces burritos and each independent shop can become a distributor of their burritos. A distributor will buy burritos via the chain’s platform and resell them to clients. In essence, we are talking about a B2B2C strategy.
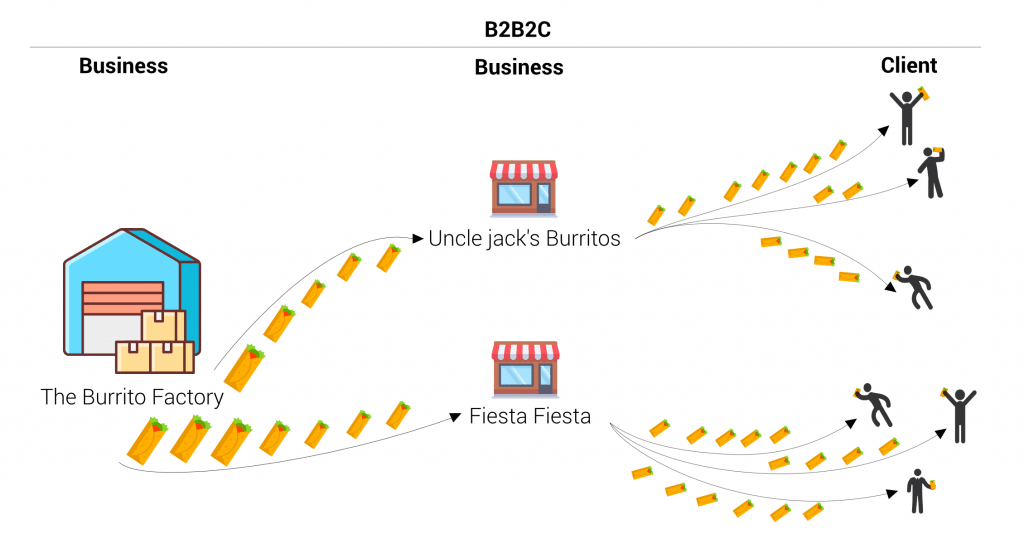
That platform that the chain uses to sell its products contains valuable data. They are planning to use this data to provide insightful information to their distributors as an extra service.
To provide this information in an understandable way, they need visualizations. Luckily, Luzmo is the ideal platform to integrate dashboards in a multi-tenant platform. In this case, multi-tenancy is the ability of one integrated Luzmo dashboard to serve multiple distributors. In other words, depending on the distributor that logs into the platform, the dashboard will show different data.
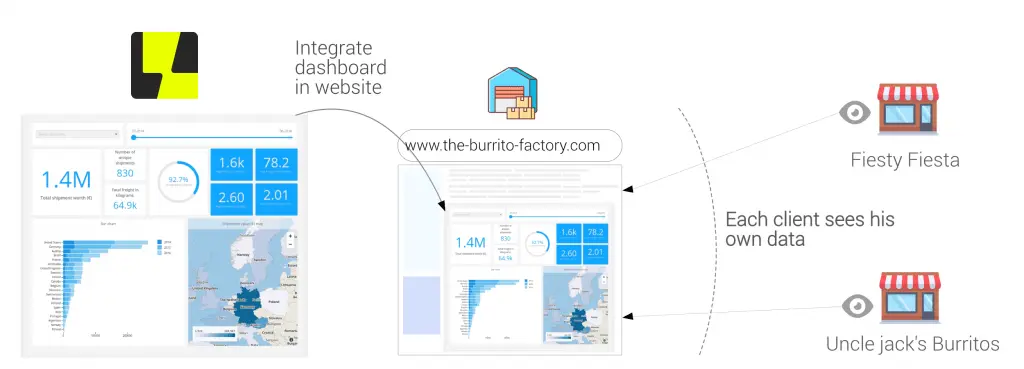
The Burrito Factory has integrated a dashboard in their platform. How do they make sure that the dashboard is populated depending on the client that is logged in?
As is often the case in IT, the answer to this question starts with: “it depends”. In this case, it depends on how the Burrito Factory designed its data layer. Since the platform is a multi-tenant application, the data layer also has to be foreseen for multi-tenancy. There are multiple ways to do this.
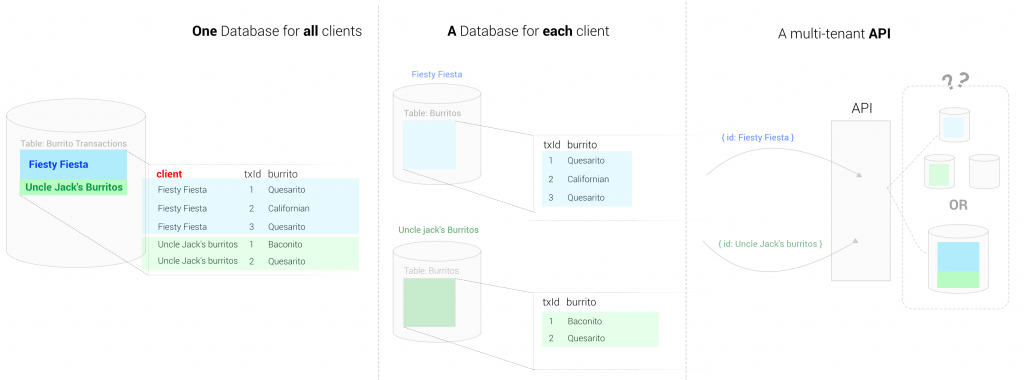
This is the most simple case, many applications start like this or are still designed like this.
For performance reasons, the database might be split up per client.
In an age of API-driven development, it is evident that a lot of companies expose an API instead of a database. However, each API is different. For example, the API might be smart enough to handle multi-tenancy. It might require you to pass the id of the distributor or a token and will then return only data. Another API might expose all data with one token and would push the responsibility to filter the data to the caller.
Luckily, Luzmo has options for each scenario.
We will go over each of these solutions in detail. To make it easier to understand it is important to know how the integration flow works.
You can do a Luzmo dashboard integration into your application in a secure way using tokens.
To secure the dashboard, you need to insert a token. You can generate it by requesting a SSO token from our Core API.
So in essence, what a Luzmo client has to do to integrate a dashboard securely is very simple. Retrieve a token, insert it in the dashboard html snippet and serve the snippet.
In case you want more information on the explanation above, there is also a video available on this topic.
When you request a token, there are a few token properties which clients can use to implement multi-tenancy. To be able to follow the explanation, we are going to explain in depth how the complete integration flow works, including what goes on behind the scene. Below is an animation that shows what actually happens in the background when loading a dashboard. This is all managed by Luzmo so you don’t have to worry about it, but it will help to understand the multi-tenancy explanations below.
In the animation flow below, pay specific attention to step 2 where a token is generated and step 5. These are the steps that will change in the following explanations. We provided the possibility to go through the animations step by step by clicking on the buttons on the right.
Enough background information, let’s go more in detail. Since every client is different, Luzmo provides a lot of options to support multi-tenancy. We will discuss the most popular implementations.
Instead of requesting a token which simply grants access to the dashboard, we will add filters to the token. In this case, the Burrito Factory has access to its distributor ids in their backend once they log in. Therefore, they can add a filter on the distributor id.
When a dashboard loads, Luzmo translates the filters to a filter syntax that your database understands. As a result, it will only return the rows that are relevant for that particular client.
Before we continue, a small word on security. Extra information such as a filter is linked to the token and is securely saved at Luzmo. In other words, only the token ID and the key will pass through the frontend. The extra information such as filters, account overrides or metadata does not exist as far as the frontend is concerned.
Instead of defining these filters directly in your code, an easier approach would be to make use of parameters. You can simply create parameters in the dashboard editor, and use them as filters on your dataset. To load a filtered dashboard for your user, you will override these parameters when requesting a SSO authorization token.
One of the main benefits of using parameters – compared to token filters – is that you can specify a default value in the dashboard editor. If you accidentally forget to override the parameter when requesting a SSO authorization token, your dataset will be filtered using the specified default value and your user will only have access to this sub-dataset (e.g. demo data in your dataset).
Using filters to filter on column id is less convenient when you have a database per client. Instead, you can override the account (host, user, password) in a token to switch between databases. You could also use this approach to change the user/password in a single database in case your database provides row-level security. Row-level security in this context means that the database can automatically filter out rows based on the credentials.
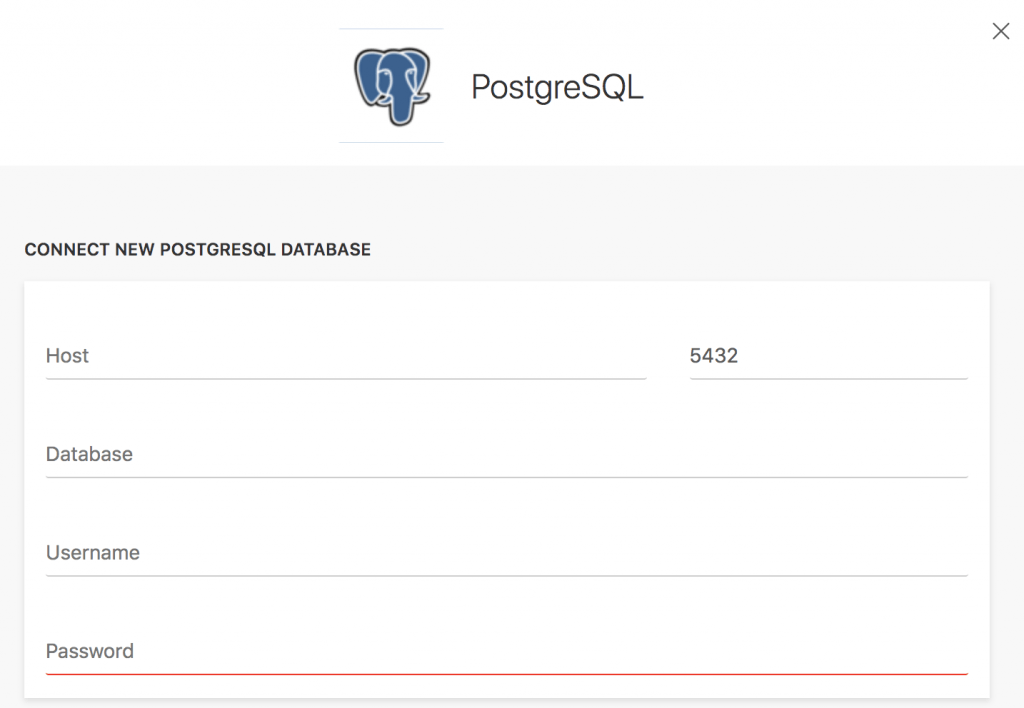
Before we continue, it is a good idea to specify what an account is in Luzmo. An account contains the information that is necessary to access a certain plugin or database. So when you connect to a database or a plugin from within Luzmo via the UI (as shown below), you are creating an account. If you already did that in Luzmo, you will recognize the following UI.
You could start by adding a default account via the UI, for example, a database with fake data. That way, you can go ahead and start dashboarding with the provided data. Once you are ready and you’ve embedded the dashboard with a token, you can switch to another account by placing an account override on the token.
In our example, we will override the host to switch to another database. When Luzmo receives a request for data from a dashboard, there is always a token included in that request. Luzmo will then notice that this token is linked to an account override. When the host is overridden, instead of launching this query to the default database on which the dashboard was built, Luzmo will launch it to the database as specified by the override.
Implementing this is very similar to the previous one, we simply have to pass these extra properties as an account override to the token, Luzmo will handle the rest. Again we have highlighted the differences.
The most powerful approach is the plugin broker. Broker plugins are Luzmo plugins which you use to apply extra business rules. Example business rules could be:
A plugin sits in between Luzmo and the data stores. Instead of sending a query to a database, Luzmo will send a query with all token properties to the plugin.
Specifically for broker plugins, there is a token property called metadata. You’ll use this property to pass information from your backend to your plugin. When Luzmo launches the query to your plugin, you will be able to use the information that you have stored in token metadata to decide how to handle the query. For example, you could use it to provide the plugin with the client id of the client that opened the dashboard.
How your plugin then handles the data call is completely in your hands! For example:
Before we started to talk about plugins, we have overridden the database host in the token. There is one more option that we have to discuss. What if you want to select a different plugin dynamically? This is an option which is rarely needed but can be very powerful.
For example, imagine in our scenario that the burrito factory provides a piece of software but requires their distributors to host it themselves. In that case, the plugin might be a part of the software that will be deployed on the client’s infrastructure. Therefore, you’ll want to override the plugin URL instead of the database host. That is exactly what base_url override does!
If this is a solution that is of interest to you, then you probably have a complex setup and want to see how it works in a complex scenario. So in the final animation below, you’ll find a complex example of base_url overrides with a broker plugin for each region and client VPC within that region.
Luzmo has a wide range of options to support multi-tenant integrations for each scenario. There are endless possibilities by combining token overrides with the plugin architecture. We have extensive documentation on both the Plugin API as integrations and token overrides.
Integration developer docs:
Happy coding!
Experience the power of Luzmo. Talk to our product experts for a guided demo or get your hands dirty with a free 10-day trial.


